Isn't she cute?

Here she is! Things are getting nice and sealed up around the stitches (nevermind the little blood crusties around the edges--those will fall off later) and NO SIGN OF INFECTION!

My New Limb

The red tube that you see coming out from about 5 inches from the end of my limb is a drain that was removed on Friday. The skin on the cap of the limb is actually the skin from the back of my lower leg flipped forward (therefore there are no stitches around the back of my stump).


Fusion Surgery #9

Look at the happy staples . . .


A very bad picture of the incision sites in the bottom of my foot (not an easy place to get a quick picture).


Surgery #7

This is how my wound was looking just before the surgery.


And we were THRILLED when it looked like this right AFTER the surgery (don't blink--it won't last long).


Three days later, it had all pulled apart again and looked like this.


So they removed the staples and I ended up with this. Oh well.


Pig + Human + Gook

Lovely, isn't it? The yellowish, snotty stuff is the Oasis (pig intestine). When they clean out my wound with these snipper things, I do not feel a thing so I know that there is none of "me" inside that wound. It is all pig. HOWEVER, the red stuff is my own skin cells trying to grow under the Oasis. That will begin to become skin over time.


This picture is from a few days ago when Dr. Carbonell made little cuts all around my wound to deliberately make it bleed. He told me that there is good stuff in the blood that will stimulate cell growth. We put on another layer of Oasis and then pinched the wound together with a steri-strip. We'll see what happens next week.

Grrrr . . .

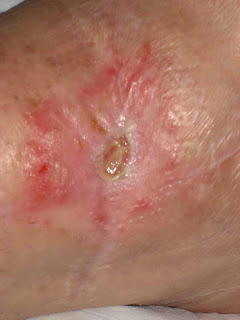
OK--Side by side, I could see how one could argue that the second (before surgery) picture here looks a lot "cleaner" . . .

But, looking at the wound--we definitely made some progress.  The bracket at least has real tissue covering it now (that little string got cut out of there later).


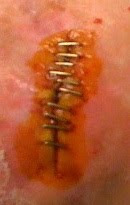
Dr. Carbonell did his best to pull the wound back shut with the steri-strip.  
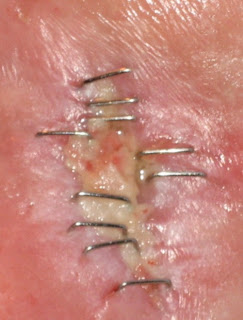
Enough already . . . use the dermaclose

These pictures show the results of my 5th and 6th surgeries.  Basically, the brackets were attached to my foot using multiple staples (ouch!).  Then, over the next two days, a tiny cord (that had been threaded through the brackets) was pulled tighter and tighter--stretching the skin and closing the wound.  

Getting smaller . . .

The first photo shows what my wound looked like with a little human newborn foreskin attached to it (called dermagraft).  Unfortunately, as you can see in the second photo, it really didn't help to generate new tissue.  The dermagraft just kind of died on the metal plate.  


The wound improves

These pictures show how my body started producing more and more healthy tissue to slowly start closing the wound.


Infection leads to the 3rd surgery

Although the 2nd surgery worked wonders, the debris that found its way into my body during the fall led to serious infection of the wound.  Dr. Carbonell went back in to open up the wound, clean it up, and remove dead tissue.  Little did we know it would take almost 4 months to make close up the wound again.


The Big Surgery

Two days after my fall, Dr. Carbonell performed a small miracle and put my talus bone back together with pins and a metal plate.  Pins were also put through the bones of my foot to attache an "external fixator."

Right after the fall

This is what my ankle looked like right after the first surgery.  Dr. Corses said that he basically just tried to clean the wound site and push all the parts back inside the foot!